The Export Tracks dialog, available from the Export Tracks item on the Project menu, is one of the central working horses of CDGFix 3 Super. using this dialog you can convert tracks between the different supported formats, extract tracks from SuperCDG and Neo+G libraries, and build various CAVS menu files (English.inx, list.txt, etc.). You can even use this dialog to automatically organize your tracks in different folders for each artist or disc.
The export works on the tracks currently loaded in the Project window, independent on the format of the original tracks. Different formats can be intermixed in the project, and all will be converted to the target format selected. The original tracks are not modified.
If the appropriate columns in the project are populated CDGFix 3 Super will use this information to ID3 tag the resulting MP3 files. The information used for ID3 tagging are disc name, track number, artist name, track title and genre. ID3 tagging can be controlled through the ID3 Tagging page of the Settings dialog. Tagging MP3 files of course depends on the selected target format; if the selected target format does not make use of MP3 files no tagging is performed.
The Export Tracks dialog looks like this:
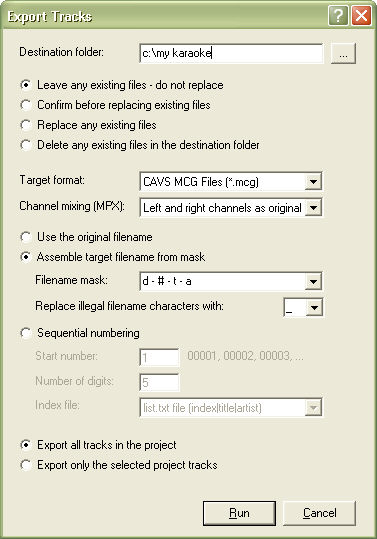
The dialog has four distinct parts, each dealing with one specific set of options. Each part is described in the following.
At the top of the dialog is the Destination folder option. This is the root folder where the resulting files will be placed. Simply click the ellipses button on the right hand side of the textbox to select the folder, or type the folder name directly into the textbox. If the folder name you type in does not exist you will be prompted to confirm creation of it when the export is started.
Next follow four options to decide how existing files - if any - should be handled:
Leave existing files - do not replace: If the export results in a file name that already exists in the destination folder CDGFix 3 Super will leave the existing file, discarding the new file.
Confirm before replacing existing files: If the export results in a file name that already exists in the destination folder CDGFix 3 Super will ask you whether to keep the old file or replace it with the new one.
Replace any existing files: CDGFix 3 Super will replace any existing file with a new file with the same name.
Delete any existing files in the destination folder: All existing files in the destination folder will be deleted when the export is started. You will be asked to confirm the deletion.
The Target Format option lets you select the required format of the tracks that are exported.
Note: You will not find SuperCDG and Neo+G in the target format list. If you want to build a SuperCDG or a Neo+G library you cannot use the Export Tracks dialog. You must instead use the Save As item on the Project menu instead.
Channel mixing (MPX) allows you to remove or copy the left or right stereo channel during the export. The main goal of this is to remove vocals on multiplexed tracks. The default selection is Left and right channels as original, meaning that the sound will not be altered in any way. The other options are as follows:
Replace left channel with right channel: The original left channel sound will be removed and the right channel will be duplicated onto the left channel. Use this option to remove vocals multiplexed on the left channel.
Replace right channel with left channel: The original right channel sound will be removed and the left channel will be duplicated onto the right channel. Use this option to remove vocals multiplexed on the right channel.
Replace left channel with silence: The left channel sound will be removed completely, leaving sound only on the right channel.
Replace right channel with silence: The right channel sound will be removed completely, leaving sound only on the left channel.
The exported tracks can be given file names in three different ways, depending on the information available in the project and what you need. The different options are:
Use the original filename
This option copies the original file name for each exported track, assigning it directly to the new tracks. If the original file names are as you want them and you only need to change the format of the tracks then this is the option to use.
Assemble target filename from mask
Using this option for file naming you can assemble the file names of the exported tracks from various columns in the project. This requires that the columns you are going to use are populated with the relevant information. If one or more of the columns are empty you populate them before exporting using the Load Track Information dialog.
When using this option you must enter a file name mask in the Filename mask field to assemble the information, or select a predefined mask from the drop down list. The drop down list also remembers recently used masks. The mask is made up of project column designators, separator characters and possibly text literals. The available project column designators are:
I: Will be replaced by the project track index in the leftmost # column.
D: Will be replaced by the disc name in the Disc column.
#: Will be replaced by the track number in the Track column.
T: Will be replaced by the track title in the Title column.
A: Will be replaced by the artist name in the Artist column.
G: Will be replaced by the track genre in the Genre column.
Normally you will insert separators in the mask, separating the various parts from each other. Usual separators are the characters - and _, but any character can be used (using one of the column designators as separator requires using a text literal - see below). You can also combine multiple characters into a single separator simply by typing them in together like -_-. Correct use of separators are essential if you at some later time need to automatically split the file names into their separate parts again using the Load Track Information dialog.
A text literal in the mask is simply a piece of constant text that is inserted directly into the resulting file name. Any character that is not recognized as a column designator is treated as a text literal. However, if you want to insert one of the reserved column designator characters you must enclose the text literal in double quotes "".
If you want to organize the exported tracks in sub-folders of the selected destination folder you can embed the path separator \ in the file name mask. CDGFix 3 Super will detect and create sub-folders in the resulting file name. For example, by using \ as a separator between the A and T fields, like A\T, you will get one folder for each artist, containing all tracks for that artist and having the title as file name.
Some examples - all assuming that the track columns are disc = SC012, track number = 05, artist = Elvis Presley, title = Jailhouse Rock, and genre = Rock:
File name mask |
Resulting file name (and possibly path) |
D - # - A - T |
SC012 - 05 - Elvis Presley - Jailhouse Rock |
D\#_A_T |
SC012\05_Elvis Presley_Jailhouse Rock |
G\A\T |
Rock\Elvis Presley\Jailhouse Rock |
"Artist="A" - Title="T |
Artist=Elvis Presley - Title=Jailhouse Rock |
Finally, the Replace illegal filename characters with option designates a character with which CDGFix 3 Super will replace any character in the resulting file name that is not allowed. Under the Microsoft Windows operating systems the following characters are not allowed in file names: \ / : * ? " < > |
Sequential numbering
The final file naming option is Sequential numbering. This will give each resulting track a sequentially increased number, as well as offer the option of creating an index file of the exported tracks. Using this file naming scheme requires the entry of a start number, number of digits to use, and optionally the selection of an index file format.
By default the starting number is set to one, but you may change this to any number that suits your needs. If you for example already have exported and numbered 1250 tracks it would make sense to change the starting number to 1251.
The number of digits option determines the minimum number of digits to use in the file names. If the actual number for a given file requires fewer digits that specified the file name will be left-padded with zeros. If more digits are required than specified the file name will be expanded to accommodate all digits.
The selection of an index file offers the following choices:
No index file: No index file will be created. Using this option ID3 tagging will be the only means of knowing the artist name and title of each exported track. If the selected target format does not include an MP3 file, for instance the BIN format, you will not be able to identify the tracks.
CSV file: This creates a comma separated file with the columns index, title and artist.
CAVS ENGLISH.inx menu file: This option will build a CAVS ENGLISH.inx menu file of the exported tracks, for use with various CAVS players (for instance the 203G players).
list.txt file: This option builds a text file with the columns index, title and artist, separated by vertical bar |. Various CAVS players can utilize this file.
CAVS ENGLISH.inx menu file + juke.txt: This option results in both a CAVS ENGLISH.inx menu file and a juke.txt file containing the columns index, title and artist, separated by hash sign #.
All index files are written to the selected destination folder.
The list.txt index file is the only index file type that offers an append option. The other index file types will result in overwriting of an existing index file of the same type after confirmation. However, if an existing list.txt index file is found you will be given the option of overwriting or appending. If you select append CDGFix 3 Super will scan the existing file to determine the next sequential file name number. This number will override the one specified.
Finally you can select which tracks to export; all tracks in the project or only the highlighted tracks. A single track is selected by left-clicking on it, while multiple tracks can be selected by holding the Shift and/or Ctrl buttons down while left-clicking. Selecting single or multiple tracks follows standard Windows selection principles.
When all options have been set to your requirements simply click the Run button to start the export process. You will see a progress dialog informing you of the work, along with a Cancel button should you want to abort the process. After the export has completed CDGFix 3 Super will present a summary of the work done. (Display of the summary is controlled on the General page in the Settings dialog.